

Contents
In today’s guest post, Richel Bilderbeek gives us some insight about some the many possible advantages of setting up a continuous integration service, showing some minimal complete examples. Richel works as a PhD in Theoretical Biology at the University of Groningen industry, in his free time teaching people from ages 7-77 about C++, Processing, Arduino and R. Falling inexplicably in love with a C++ code snippet of Doom as a kid, he started using C++ only since 2001, and you can reach him through his website.
Continuous integration with Travis CI

Minecraft players can tell you: automation is great! It usually takes some time to set up, but then you profit indefinitely. But where my minor programming students set up some Minecraft farming contraption, I like to harvest as much information from my code that I can get. This ranges from the basic question ‘Does it build (today)?’ to getting code coverage, profiling information and whatever I choose.

This article introduces how to add continuous integration and other goodies to some simple example software projects.
What is continuous integration?
Continuous integration is the practice of directly/continuously merging new code within an existing project. Adding code should be easy to do. In this article, I will extend this definition of CI, by also including all the processes that test and measure the newly added code. As a definition I will use the following:
Continuous integration is the practice of directly/continuously merging new code within an existing project, followed by automatically testing and measuring the new code its behavior and quality, resulting in a diagnostic report fast (say, within an hour).
A continuous integration service is a website that allows for continuous integration.
There are many advantages of setting up a continuous integration service:
- Errors are detected directly after a commit
- The build script shows all steps to build your project, and is tested to work
- Code can be analysed statically, that, as a bonus, may aid beginners learning the language
- Quality can be enforced in incoming Pull Requests
- Run-time profiling allows to see which commits have impacted run-time speed
There are some potential disadvantages of setting up a continuous integration service:
- Disruption of the work process due to a false negative (for example, a Heisenbug)
- It takes some time to set up
- For commercial development, a continuous integration service comes with a price
This article will show these minimal-but-complete setups in detail:
- Building a C++98 Hello World program
- Building a C++17 Hello World program
- Adding static code analysis by
cppcheck - Profiling your code
Some more extensions are mentioned before concluding that adding continuous integration to your build is beneficial for beginners, novices and experts.
Tools to use
The tools I show in this article are just an example. To have complete examples, I had to pick some specific programs/websites/services out of many.
In the table below, you can see the tools I picked for this article, and alternatives that probably are just as good:
| Tools I will be using | Examples of alternatives that are just as good |
|---|---|
git |
BitKeeper, Gnu Bazaar, Mercurial |
| GitHub | BitBucket, Sourceforge, GNU Savannah |
| Travis CI | Jenkins, Appveyor, Codeship, Wercker |
| GCC | clang |
cppcheck |
clang-tidy, OCLint |
gprof |
perf |
Although the tools in isolation are just as good, their combinations may work less well. Especially the combination of GitHub and Travis works seamlessly.
Setting up GitHub and Travis
Setting up GitHub and Travis is very straightforward. Here a global overview of what needs to be done.
To setup a GitHub account, go to https://github.com.

Setting up an account is easy. For free and open source development, this is free.
To setup a Travis account, go to https://travis-ci.org.

Using your GitHub account, this is a breeze: just click on ‘Sign in with GitHub’.
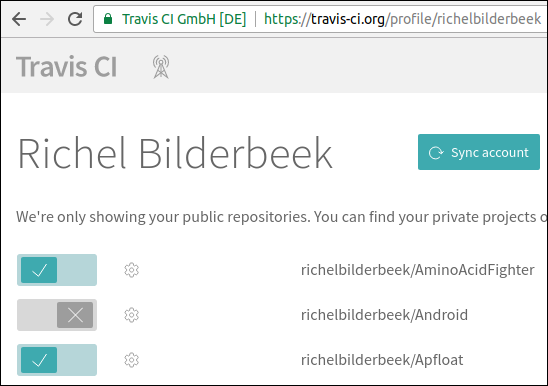
Travis will show you all GitHub repository you have. You will have to activate these by clicking on a slider:
After submitting your first Travis script, Travis will take you to a different first dialog. This dialog shows the build status of all GitHubs checked by Travis:

Building a C++98 Hello World program
The first example shows how to test that a C++98 Hello World program compiles.
This is the code that will be built:
#include

int main()
{
std::cout << "Hello world\n";
}
Travis needs to be instructed what to do when triggered. These instruction must be put in a file named .travis.yml and looks like this:
language: cpp
compiler: gcc

script:
- g++ main.cpp -o travis_gcc_cpp98
- ./travis_gcc_cpp98
First, the language and compiler are specified. In the script part, the project is built and then run.
When Travis CI is triggered, it will result in the following build log:
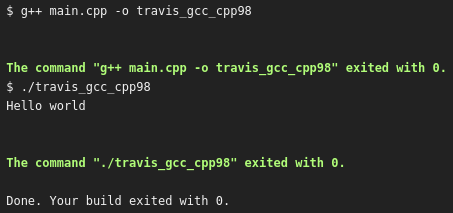
From this day on, we have code that is checked to compile everytime the code changes. Also, the same happens if a Pull Request is sent to us: already before merging, GitHub shows if that merge will break the build.
Building a C++17 Hello World program
To celebrate C++17 has been completed [1], I will add a C++17 feature:
#include <iostream>

int main()
{
  static_assert("C++17");
  std::cout << "Hello world\n";
}
To build this project successfully, a more elaborate Travis build script is needed:
language: cpp
compiler: gcc
dist: trusty

before_install:
  - sudo add-apt-repository -y ppa:ubuntu-toolchain-r/test
  - sudo apt-get update -qq

install:
  - sudo apt-get install -qq g++-6
  - sudo update-alternatives --install /usr/bin/g++ g++ /usr/bin/g++-6 90

script:
  - g++ main.cpp -std=c++17 -o travis_gcc_cpp17
  - ./travis_gcc_cpp17
Travis will setup a newer distro (Trusty Tahr), instead of the one used by default (Precise Pangolin). A PPA is added for (even) newer packages and g++-6 is installed. Then g++ is redirected to use g++-6.

This Travis script is one of many ways to achieve the same and not necessarily the best in all aspects. Feel encouraged to suggest improvements to any of the GitHubs used in this article. As when you’d submit me a Pull Request, Travis will show me both if this C++17 code still compiles and how long it took to run the script.
Adding static code analysis by cppcheck
Spot the bug:
int main()
{
  int a[3] = { 0, 1, 2 };
  a[3] = 4;
}
For an experienced C++ developer, this is all too easy. But for someone stepping in from another language, it may be not, as not all programming languages have arrays starting at index zero. Additionally, access violations are usually more conspicuous.
A static code analysis tool should be able to detect this access violation and give a friendly reminder to the person that wrote the code.
This Travis script tests the project to build and tests the code statically with cppcheck:
language: cpp
compiler: gcc
dist: trusty

before_install:
  # C++17
  - sudo add-apt-repository -y ppa:ubuntu-toolchain-r/test
  - sudo apt-get update -qq

install:
  # C++17
  - sudo apt-get install -qq g++-6
  - sudo update-alternatives --install /usr/bin/g++ g++ /usr/bin/g++-6 90
  # cppcheck
  - sudo apt-get install -qq cppcheck

script:
  # Build and run this project
  - g++ main.cpp -std=c++17 -o travis_gcc_cpp17_cppcheck
  - ./travis_gcc_cpp17_cppcheck
  # cppcheck
  - cppcheck --quiet --error-exitcode=1 .
Since the previous build script, little has changed. In the install section, cppcheck is installed. In the script section, cppcheck is called to test the files in its folder.
This is the Travis output:

Great, Travis and cppcheck have detected this problem. Due to this, the Travis build has failed. The person that submitted this commit may have been reminded that in C++ indices start at zero.
Adding static code analysis tools to a Travis scripts do not only help experts. As in this example, it may help teach beginners. It will give them a friendly reminder about how the language works, instead of a segmentation fault that may-or-may-not occur.
Profiling your code
Some beginner C++ programmers have an obsession with run-time speed. It is known we should prefer measuring over following a gut-feeling, but a beginner may not know how to do profiling.
In this example, the runtime speed of std::sort is compared against a handcrafted (‘lightning fast!’) function:
#include <algorithm>
#include <cassert>
#include <iostream>
#include <numeric>
#include <vector>

std::vector<int> sort_a(std::vector<int> v)
{
 const auto sz = v.size();
  for(auto i = 0u; i != sz-1; ++i)
  {
    for(auto j = 0u; j != sz-i-1; ++j)
    {
      if(v[j] > v[j+1])
      {
        std::swap(v[j], v[j+1]);
      }
    }
  }
  return v;
}

std::vector<int> sort_b(std::vector<int> v)
{
  std::sort(std::begin(v), std::end(v));
  return v;
}

auto create_series()
{
  const int sz{100'000};
  std::vector<int> v(sz);
  std::iota(std::begin(v), std::end(v), 0);
  std::reverse(std::begin(v), std::end(v));
  return v;
}

int main()
{
  assert(!"Do not profile in debug mode");
  const auto v = create_series();
  const auto a = sort_a(v);
  const auto b = sort_b(v);
  if (a != b) return 1;
}
The two sorting implementations work on the same input and are checked to have the same output. The exact working of sort_a is unimportant (psst, it’s a bubble sort!). The assert statement ensures that profiling is done in release mode.
Travis runs and profiles the code with the following script:
language: cpp
compiler: gcc
dist: trusty

before_install:
  # C++17
  - sudo add-apt-repository --yes ppa:ubuntu-toolchain-r/test
  - sudo apt-get update -qq

install:
  # C++17
  - sudo apt-get install -qq g++-6
  - sudo update-alternatives --install /usr/bin/g++ g++ /usr/bin/g++-6 90

script:
  - g++ main.cpp -DNDEBUG -O2 -pg -std=c++17 -o travis_gcc_cpp17_gprof
  - ./travis_gcc_cpp17_gprof
  # produce the gprof log
  - gprof ./travis_gcc_cpp17_gprof  > gprof.log
  - head gprof.log -n 100
There is not much new in the script. The code is compiled differently to enable a release mode with gprof annotations. After running the code, a profiling log is created, as shown here:
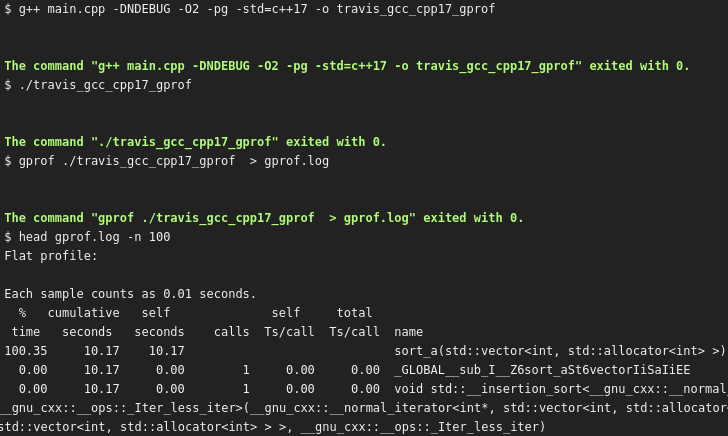
It shows clearly that std::sort heavily outcompeted the ‘lightning fast!’ function.
This profiling example only shows two implementations competing with each other. In this simple example, that could just as easily be measured with an STL timer. But using gprof scales better to bigger projects. It’s the bigger projects in which profiling information gets more interesting, as there are many functions, each with its own Big-O complexity. gprof will show which functions take up the majority of the computation time.
As a bonus, gprof does an excellent job in convincing beginners that most functions are irrelevant to optimize.
Other extensions
In my own projects, I add much more checks to my projects:
| Task | Examples |
|---|---|
| Run a test suite | Boost.Test, QTest |
| Measuring code coverage | gcov and Codecov |
| Checking for style | OCLint |
| Detecting memory leaks | valgrind |
| Checking for undefined behavior | UBSAN, tsan |
| Check if the documentation has stylistic issues | proselint |
An overview of all my work can be viewed in my Travis CI C++ tutorial. If I do not use your favorite tool yet, I’d be happy to add it to my battery of tools.
Conclusion
We know automation is good. GitHub and Travis happily do whatever you’d like them to do. Setting up is easy: you’ll need a GitHub account and a Travis script that has all your needs. Not only will continuous integration help an expert in finding those hard-to-find bugs, but it will also aid a beginner in leaning C++.
Permalink
Really awesome article on so many new (at least for me) tools to use for doing testing, code coverage, automation, profiling, list goes on…OMG…You’ve completed a whole series on integration.
Your project on GitHub
https://github.com/richelbilderbeek/travis_cpp_tutorial/blob/master/travis_cpp_tutorial.pdf
is very informative and gives confidence to learn Travis CI for multiple purposes…
Permalink