

Contents
Today’s guest post is by Saurabh Hooda. Saurabh is one of the co-founders of hackr.io. You can find Saurabh on Twitter and Medium.

C++ is, hands down, one of the most powerful and most flexible programming languages there is. Arguably, there’s not a single thing that you can not do in C++, and despite its old age, it’s still in heavy industrial use. In 2017, there were over 230 thousand pull requests for C++ projects as it ranked as one of the most popular languages on GitHub. However, this tremendous level of flexibility and functionality is not an excuse for writing messy buggy code. Writing unmanaged code in C++ -also known as native code- could be a hefty task, this is why adding testing to your development kit is almost as crucial as the code-writing itself.
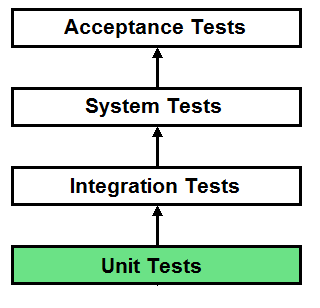
There are multiple types of testing phases that your code can undertake, each of which focuses on certain features of the code, but they are inseparable in the way that they cover each other’s blind spot. What we’re going to focus on today is Unit Testing, which is a crucial step and a fundamental one for world-class software to excel.
What is unit testing, when to use it?
Unit testing aims to test the individual functionalities within your software to assert that everything is working properly as it should. The more accurate term here is “Fit properly”. By creating a test-suite for all the pieces within your code, you can use unit testing iteratively within the development, that is to assure that everything is still functioning as it should even after the addition of the new lines of code. There are many key advantages to using Unit Testing.
First of all, it prepares your code for proper modularity and reusability. When you get into the unit testing mentality, you’ll always be optimizing your code whilst keeping the tests in mind which results in breaking the code into precise pieces each doing a specific function rather than having one fuzzy big function doing everything. In some ways, Unit testing makes your code writing even faster than normal. Rather than doing the good-old-fashioned testing method of setting breakpoints and jumping to the GUI to test some inputs praying that it works altogether, you write the code for the test you want to make and get results faster than the traditional way, in addition, you can run them as much as you like.
It does, of course, come at the expense of some development time, but in the end, it’s absolutely worth it. On the long run, it prevents the code from breaking functionalities when new features are added, and if something goes wrong, you’ll know exactly where did it happen, and maybe even why it did. However, there’s a very common misconception of either overdoing unit testing, or under-doing it. Generally speaking, there are cases when unit testing is not necessary.
Here are a few guidelines to follow when doing unit testing:
● Do not attempt to test the entire input space, this will only prove to be a waste of time.
● Do not test the parts of your code that aren’t going to break. Setter and getter functions, for instance, do not need testing because they are simply unbreakable.
● Use test cases that are close to production and that the user is most likely to enter. If you keep on testing the edge cases all the time, you might end up missing something in between.
● Write independent test cases. Complicated interdependent tests are not meant for the unit testing phase. Instead, focus on writing independent tests, each aims at certain functionality.
● Do not forget to use version control to keep track of your written tests, and keep on running the tests continuously and as frequently as possible.
● Do not go around creating your own framework, there’s probably no need for that. And it will most likely prove to be waste of time, most frameworks nowadays (we’ll talk about them later) offer almost everything you’d need, so there’s no need to reinvent the wheel.
Running our first test in Visual Studio
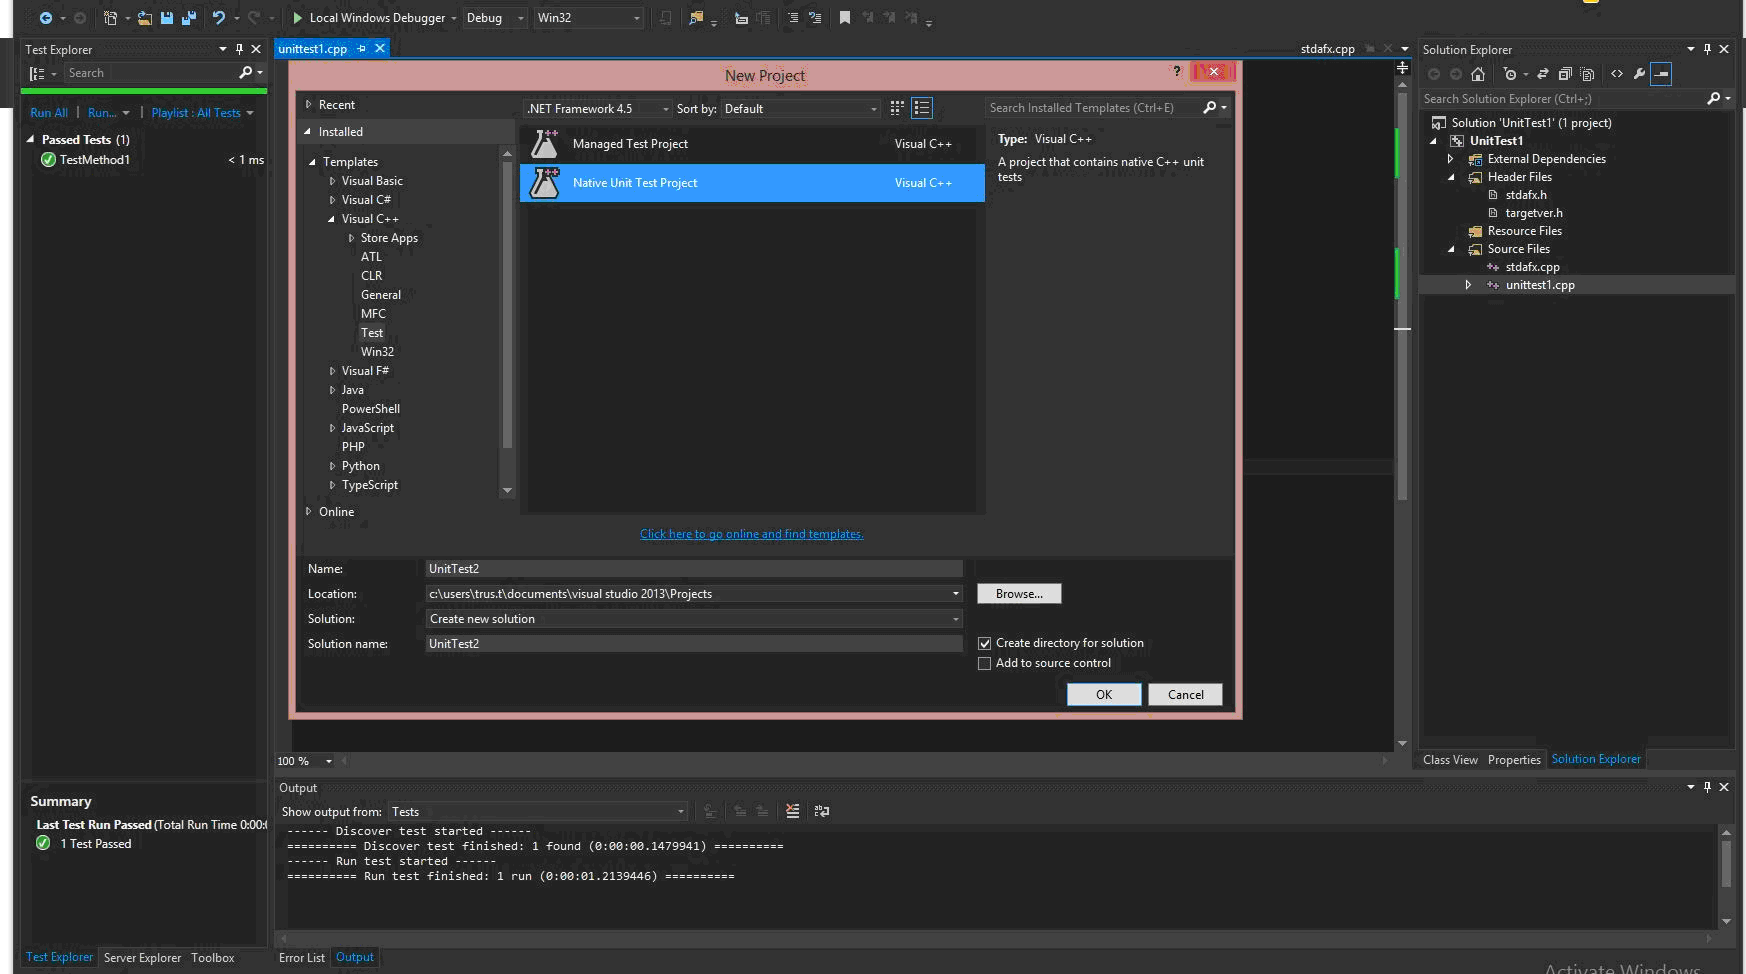
Open a new project in the visual studio panel, and under the C++ tab, choose the test collection. You’ll then be prompted to choose the test type, we’ll go for Native Unit Testing now. Once you, in, you’ll find two source files, go to the unittest1.cpp file. You’ll find a CppUnitTest header included at the top. That is, we’ll be using the Microsoft CppUnitTest Framework, which is one of many available unit testing frameworks available for C++, we’ll talk about others later.
The unit test is made through a Test_class, that contains all the methods we want to test. In order to start testing, we’ll use a simple function like the tester function in the picture. The tester function makes nothing more than adding two variables, the floats a and b and returning the added value. Inside a Test_Method, we start specifying the test flow and establish the case we want to test.
For the first simple test, we define two float variables, one that contains a value of zero, and the other contains the addition result of two zeros. Quite intuitive, but it conveys the main idea. We then call the Assert class and using one of its functions, we make sure that the expected and actual values fit together. For starters, we use the AreEqual function to check if they are equal.

After finishing the code, we hit the test tab on the top, and we choose to run all tests. On the right, we see the results of each test as well as the time taken by each test. If we want to run more than one test, we can add more Test_Methods to our Test_Class. However, you’re not allowed to list Test_Method blocks within each other.

There are many different types of assertions that we can make. There are the AreEqual and AreNotEqual which are quite intuitive. There’s also the IsNull and IsNotNull to check the nullity of certain variables, it’s especially useful when you’re dealing with pointers. There’s even an ExpectException assertion, which checks if the following function throws the expected exception or not. You can read more about the CppUnitTest framework through Microsoft’s documentation.
It’s quite infeasible, however, to copy and paste every single function you want to test within the test project. What you can do instead, is to create a test project inside your working project’s solution. Right click on the Test project and choose properties. From there, go to Common Properties, under the References section, click the add new reference. Check the projects you want to test and press ok. Now you can include the headers you want to access and use the existing classes/functions without having to rewrite everything.
Other unit testing frameworks
CppUnitTest is not the only unit testing framework that you could use. There’s a lot of frameworks, in fact, and each one opts to offer something unique. One famous candidate is Google’s framework: Gtest. Gtest posses a rich set of assertions as well as the ability to make your own assertions. It can test for fatal and non-fatal failures and make death-tests as well. The syntax is quite similar to Microsoft’s framework so it’s quite readable too. If you found yourself unable to use the <gtest/gtest.h> head to the Nuget Packages on your project and browse to find Gtest, when you add it to the project the framework should function properly.

One other framework loved by developers is Cgreen, while it’s a software tester and quality assurance program, it provides the same functionalities for a unit testing framework. For the sake of completeness, we ought to mention Boost and Unit++ as famous candidates to use. Boost posses a top-notch documentation, with clear examples to guide you through the usage of the framework. It provides a good list of functionalities for almost anything you’d need, closeness, equality, less or greater than, bitwise operations, you name it. It handles exceptions and crashes very well too.
Summary
There’s no need to stress the importance of integrating a test suite with your development cycle. It might look troublesome at first, but the benefits on the long run are totally worth it. It’s not just about writing test code, it’s about being able to test your code efficiently at every cycle of development and at any given moment. Unit tests are powerful when it comes to developing world-class software as it will help you predict your software’s behavior in every situation – or almost every situation.
There’s no need to pick up more than one framework if you’ve got yourself comfortable in, just get yourself acquainted with its functionalities to leverage that power and you’re good to go. Don’t forget that unit tests are just the first step of good software, but it sets you well for the upcoming tests and makes the results of those tests more vivid, should anyone of these tests fail, you won’t have to test separate functionalities and you’ll most likely spot where the integration went wrong.
If you are interested in learning advanced C++, you can seek C++ tutorials and courses on the internet as they support many developer-friendly materials.
Permalink
i liked the purpose of the article and concepts told…very nice and informative.
Permalink
An article on unit testing C++ code that “for completeness” mentions Unit++, but omits Catch (https://github.com/catchorg/Catch2) or Doctest (https://github.com/onqtam/doctest)?